Learn the best techniques for repairing cinder block walls and foundation walls in this comprehensive guide. Improve your home’s structure today!If you have a cinder block wall that’s showing signs of wear and tear, don’t worry – it’s possible to repair it yourself with the right tools and know-how. In this comprehensive blog post, we’ll walk you through everything you need to know about repairing cinder block walls, whether it’s a single block or an entire foundation. We’ll cover the tools and materials you’ll need, step-by-step instructions for making repairs, and tips for ensuring that your wall is strong and durable once again. With the information provided in this post, you’ll be able to tackle any cinder block wall repair project with confidence and know that you’re making the right repairs to keep your home or building safe and sturdy. Whether you’re a seasoned DIY enthusiast or a novice looking to learn new skills, this guide will give you the knowledge you need to repair your cinder block wall effectively.
How To Repair A Cinder Block Wall
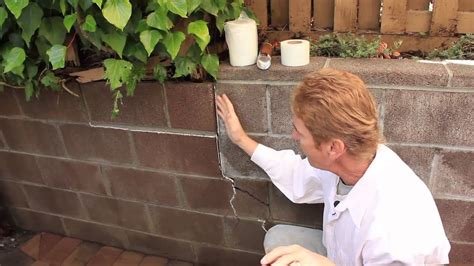
Repairing a cinder block wall can be a daunting task, but with the right tools and techniques, it is definitely doable. One common issue with cinder block walls is cracking, which can be caused by a variety of factors such as foundation settling, temperature changes, or heavy loads. To repair a cracked cinder block wall, start by chiseling out the crack to create a v-shaped groove, then fill it with a high-quality concrete patching compound. Make sure to press the compound firmly into the groove to ensure a strong bond.
Another common problem with cinder block walls is efflorescence, which is the white, powdery substance that appears on the surface. To remove efflorescence, scrub the wall with a mixture of water and vinegar, then rinse thoroughly with clean water. And finally, to prevent further damage to your cinder block wall, consider applying a waterproof sealant to protect it from the elements. By following these steps, you can effectively repair and maintain your cinder block wall for years to come.
How To Repair Cinder Block Walls
Repairing cinder block walls can seem like a daunting task, but with the right tools and knowledge, it can be a manageable project. The first step is to assess the damage and determine the cause of the issue. Whether it’s due to water damage, foundation settling, or simple wear and tear, understanding the root of the problem is crucial in creating a long-lasting solution.
Once you’ve identified the cause, the next step is to gather the necessary materials, including mortar, a trowel, and a wire brush. It’s important to clean the area thoroughly before beginning any repairs to ensure the new mortar will adhere properly. From there, carefully apply the mortar to the damaged areas, using the wire brush to blend the new mortar with the existing blocks. Allow the mortar to dry completely before assessing the repair and making any necessary finishing touches.
How To Repair A Cinder Block Foundation Wall
When it comes to repairing a cinder block foundation wall, there are several steps you can take to ensure the job is done properly. The first step is to assess the extent of the damage. Look for any visible cracks or holes, and determine if there is any moisture or water seepage. This will help you identify the best approach for repairing the wall.
Next, gather the necessary tools and materials for the repair. You’ll need concrete mix, a trowel, a wire brush, and a hammer. Start by chiseling out any loose or deteriorating concrete from the damaged area. Once the area is clean, mix the concrete according to the manufacturer’s instructions and apply it to the damaged area using the trowel. Smooth out the surface and allow it to dry completely before assessing the repair. By following these steps, you can effectively repair a cinder block foundation wall and ensure its stability for years to come.