Learn how to repair mortar joints, cracks, and brick chimney with our expert guide. Save time and money with our easy-to-follow tips.Are you noticing deteriorating mortar on your brick surfaces? Don’t worry, it’s a common issue that can be easily fixed with the right tools and techniques. In this blog post, we will discuss everything you need to know about repairing brick mortar. From repairing mortar joints to fixing cracks and addressing issues on a brick chimney, we’ve got you covered. We’ll provide step-by-step instructions and helpful tips to ensure that your brick surfaces are restored to their original condition. Whether you’re a seasoned DIYer or a complete novice, this guide will walk you through the process of repairing brick mortar, so you can tackle this home improvement project with confidence. So, grab your tools and let’s get started on transforming those unsightly mortar problems into a beautifully restored brick surface.
How To Repair Mortar Joints
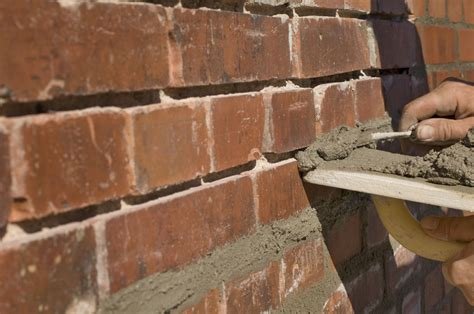
When it comes to maintaining the structural integrity of your brick walls, ensuring that the mortar joints are in good condition is crucial. Over time, mortar joints can deteriorate due to weather, age, or other factors, leading to potential water damage and weakening of the wall. Fortunately, repairing mortar joints is a relatively simple and straightforward process that can be done by homeowners with the right tools and materials.
First, you’ll need to carefully remove the damaged mortar using a chisel or joint raker. Make sure to clean out the joints thoroughly to ensure a strong bond with the new mortar. Once the joints are cleaned, mix the new mortar according to the manufacturer’s instructions, making sure to achieve the right consistency. Using a pointing trowel, carefully pack the new mortar into the joints, ensuring that it is fully compacted and even with the existing mortar. Finally, use a striking tool to remove any excess mortar and create a clean finish. Allow the mortar to cure for the recommended time, and your brick wall will be good as new.
How To Repair Mortar Cracks
Do you have unsightly cracks in the mortar of your brick walls? These cracks can not only detract from the appearance of your home, but they can also lead to more serious structural issues if left unaddressed. Luckily, repairing mortar cracks is a relatively simple task that can be completed by a savvy homeowner. In this blog post, we will outline the steps for repairing mortar cracks in your brick walls, so you can restore the beauty and integrity of your home.
First and foremost, it’s important to assess the extent of the damage to determine the best course of action. Start by examining the cracks in the mortar and identifying any loose or deteriorating sections. Use a chisel and hammer to carefully remove any loose mortar, being cautious not to damage the surrounding bricks. Once the loose mortar has been removed, use a cleaning brush to clear away any debris and dust from the area.
How To Repair Mortar On Brick Chimney
When it comes to maintaining the integrity of your brick chimney, repairing mortar joints is a crucial task. Over time, the mortar between the bricks can deteriorate due to weather exposure, water damage, and general wear and tear. The first step in repairing mortar on a brick chimney is to carefully inspect the mortar joints for any signs of damage. Look for cracks, gaps, or areas where the mortar has completely worn away. Once you have identified the areas in need of repair, you can begin the process of removing the damaged mortar.
Using a chisel and hammer, carefully chip away the old, damaged mortar, being careful not to damage the surrounding bricks. Once the old mortar has been removed, you will need to prepare the area for new mortar. This involves cleaning the joints thoroughly and wetting them with water to ensure proper adhesion. Then, mix a fresh batch of mortar and use a trowel to carefully fill in the joints, ensuring that the new mortar is flush with the surface of the bricks. Allow the new mortar to set for a few days, and your chimney should be as good as new!