Learn how to fix a leaky sink drain, faucet, or pipe with our expert tips and step-by-step guide. Say goodbye to leaky sinks for good!Are you tired of the constant drip, drip, drip coming from your sink? A leaking sink can be a major inconvenience, not to mention the potential for water damage to your home. But fear not, because in this blog post, we will cover everything you need to know about repairing a leaking sink. Whether it’s a leaky drain, faucet, or pipe, we’ve got you covered.
In the following sections, we will provide step-by-step instructions on how to fix each of these common issues. You don’t need to be a plumbing expert to tackle these repairs – with a few basic tools and some know-how, you can put an end to that pesky leak once and for all. So roll up your sleeves and get ready to learn how to become your own handyman (or woman) as we dive into the world of sink repair.
How to Fix a Leaky Sink Drain
Is your sink drain constantly leaking and causing a mess in your kitchen or bathroom? This common household issue can be frustrating to deal with, but thankfully, it is a problem that can be easily fixed with a few simple steps. Whether you have a slow drip or a major leak, taking care of a leaky sink drain is essential to prevent water damage and mold growth. Here’s how you can tackle this common plumbing problem and restore peace to your home.
First, you’ll need to gather the necessary tools and materials: a pipe wrench, plumber’s putty, pipe sealant tape, a bucket, and a dishtowel. Once you have these items ready, you can start by turning off the water supply to the sink and placing the bucket under the drain to catch any remaining water. Use the pipe wrench to carefully loosen the slip nut and remove the P-trap from the drain pipe. Inspect the P-trap for any cracks or damage, and if necessary, replace it with a new one. Clean the area around the drain pipe and the P-trap thoroughly, and apply plumber’s putty to the threads of the drain pipe. Then, reattach the P-trap and tighten the slip nut securely with the pipe wrench. Finally, turn the water supply back on and check for any remaining leaks. With these simple steps, you can successfully repair a leaky sink drain and prevent further water damage in your home.
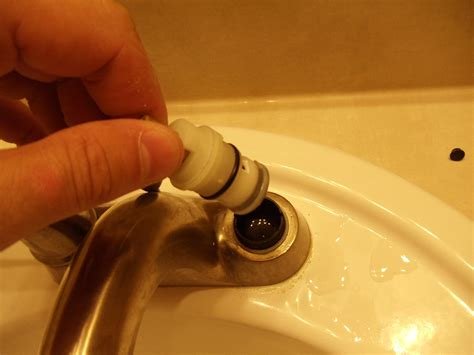
How to Fix a Leaky Sink Faucet
Having a leaky sink faucet can be frustrating and wasteful. The constant dripping not only leads to water wastage but can also cause damage to your sink and surrounding area. However, fixing a leaky sink faucet is not as complicated as it may seem. With a few simple tools and some basic knowledge, you can easily repair the leak and save yourself from the annoyance of a dripping faucet.
Firstly, you will need to identify the type of faucet you have as this will determine the repair process. The most common types of sink faucets are cartridge, ceramic disk, ball, and compression faucets. Once you have determined the type of faucet, you can proceed with the necessary steps to fix the leak. This may involve replacing a worn out O-ring, tightening loose parts, or cleaning the faucet aerator to remove any build-up that could be causing the leak.
How to Fix a Leaking Sink Pipe
Dealing with a leaking sink pipe can be a frustrating and messy experience. However, with the right tools and know-how, it’s a problem that can be fixed relatively easily. The first step is to locate the source of the leak. This may require removing any items stored under the sink and inspecting the pipes for any signs of water. Once the source of the leak has been identified, the next step is to turn off the water supply to the sink. This can usually be done by locating the shut-off valve under the sink and turning it clockwise to shut off the water.
With the water supply turned off, it’s now time to address the leak. If the leak is coming from a joint or connection in the pipe, it may be as simple as tightening the connection with a wrench. If the pipe itself is the source of the leak, it may need to be replaced. This will involve cutting out the damaged section of pipe and replacing it with a new piece. Once the repair has been made, it’s important to turn the water supply back on and check for any remaining leaks. If the leak has been successfully repaired, be sure to clean up any standing water and dry the area to prevent any further damage.