Learn expert tips for repairing doorbell transformers, buttons, and wires. Get your doorbell working again with our easy-to-follow repair guide.Have you ever been frustrated by the constant buzzing of a malfunctioning doorbell? It’s a common household annoyance, but the good news is that it’s often a simple fix. In this blog post, we will cover the basics of repairing a doorbell, from diagnosing the problem to making the necessary repairs. We’ll guide you through the process step by step, so even if you’re not the most DIY-savvy person, you’ll be able to tackle this project with confidence.
We’ll start by discussing how to repair a doorbell transformer, which is often the culprit when the doorbell stops working. Then, we’ll move on to addressing issues with the doorbell button, as well as repairing any damaged doorbell wires. By the end of this post, you’ll have the knowledge and skills to get your doorbell back in working order. So, grab your tools and let’s get started on fixing that pesky doorbell!
How To Repair A Doorbell Transformer
If your doorbell has stopped working, the issue could be with the doorbell transformer. A faulty transformer can prevent the doorbell from receiving power and cause it to malfunction. To repair the doorbell transformer, the first step is to locate the transformer. It is typically located near the main electrical panel of the house. Once you have found the transformer, the next step is to check for any loose connections or damaged wires. Use a screwdriver to tighten any loose connections and replace any damaged wires with new ones.
After checking the connections and wires, you can use a multimeter to test the voltage output of the transformer. If the voltage is lower than the recommended range, the transformer may need to be replaced. You can purchase a new transformer from a hardware store and install it in place of the old one. Once the new transformer is installed, test the doorbell to ensure that it is working properly. By following these steps, you can effectively repair a doorbell transformer and restore the functionality of your doorbell.
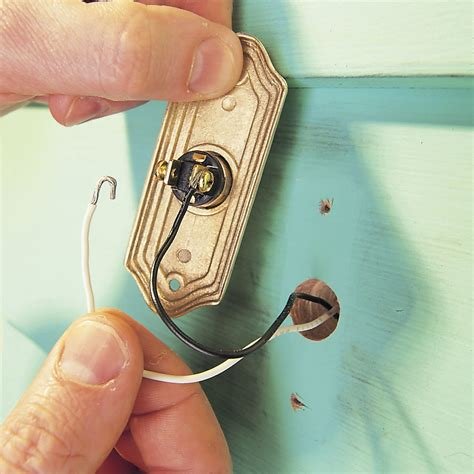
How To Repair A Doorbell Button
When your doorbell button stops working, it can be frustrating and inconvenient. But before you call a professional, try these simple steps to repair it yourself.
First, check the wiring connected to the button. Sometimes the wires can become loose or damaged, causing the button to malfunction. Use a voltage tester to ensure that the wires are receiving power. If not, you may need to replace the wiring. Next, clean the button and surrounding area. Dirt and debris can build up over time, preventing the button from making a proper connection. Use a small brush or cloth to gently clean the button and remove any obstructions. If the button still does not work, you may need to replace the button altogether. Purchase a new doorbell button from a hardware store and carefully follow the manufacturer’s instructions for installation.
How To Repair A Doorbell Wire
When your doorbell stops working, it can be a frustrating experience. One of the common issues that can cause a doorbell to stop working is a damaged or broken wire. The good news is that repairing a doorbell wire is a relatively simple process that can be done with just a few tools and some basic knowledge of electrical systems.
The first step in repairing a doorbell wire is to identify the location of the damaged wire. This can usually be done by visually inspecting the wires running from the doorbell button to the transformer. Once you have located the damaged wire, you will need to carefully strip away the insulation to expose the bare wire underneath. After that, you can either splice the wire back together using a wire connector, or replace the damaged section of wire entirely. Once the wire is repaired or replaced, you can test the doorbell to ensure that it is working properly once again.