Learn how to open, wire, and clean an Xbox One controller with our easy-to-follow guide. Keep your controller in top condition!Do you have a malfunctioning Xbox One controller that’s in need of some repair? If so, you’re in the right place. In this comprehensive guide, we’ll walk you through the steps to open, wire, and clean your Xbox One controller, so you can get back to gaming in no time. Whether your controller is experiencing drift, unresponsive buttons, or connectivity issues, we’ve got you covered. With just a few tools and some patience, you can save yourself the expense and hassle of having to replace your controller. So, grab your controller and let’s get started on bringing it back to peak performance.
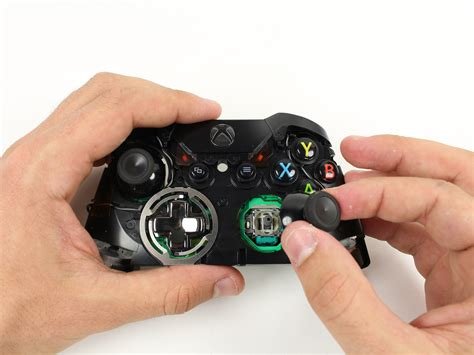
How To Open An Xbox One Controller
Many gamers have encountered the frustrating moment when their Xbox One controller stops working, and they don’t know how to fix it. The good news is that most issues with the Xbox One controller can be resolved by simply opening it up and making some repairs. Whether it’s a sticky button, a drifting joystick, or a broken trigger, the process of opening an Xbox One controller is relatively straightforward.
To open an Xbox One controller, you will need a few tools, including a small Phillips head screwdriver, a plastic opening tool, and optionally, a pair of tweezers. The first step is to remove the screws from the back of the controller using the Phillips head screwdriver. Once the screws are removed, use the plastic opening tool to gently pry apart the two halves of the controller. It’s important to be careful during this step, as there are delicate ribbons and cables inside the controller that can be easily damaged.
How To Wire An Xbox One Controller
Are you having trouble with your Xbox One controller? One common issue that can affect the functionality of the controller is faulty wiring. If you’re comfortable with a bit of DIY, you can attempt to wire your Xbox One controller yourself. Here’s a step-by-step guide on how to do it.
First, gather all the necessary tools and materials. You’ll need a small screwdriver, replacement wiring, and a soldering iron. Once you have everything you need, carefully remove the screws from the back of the controller using the screwdriver. Gently pry the controller open to reveal the internal components. Identify the faulty wiring and carefully desolder it from the circuit board. Next, solder the replacement wiring in place, ensuring a secure connection. Once the wiring is in place, reassemble the controller and test it out. With a bit of patience and precision, you can successfully wire your Xbox One controller and get it back to working order.
How To Clean An Xbox One Controller
Keeping your Xbox One controller clean is essential for maintaining its performance and longevity. Over time, dirt, oil, and sweat can build up on the surface of the controller, leading to sticky buttons and unresponsive controls. To clean your Xbox One controller, start by removing the batteries and any accessories, such as a headset or charging cable. Use a soft, slightly damp cloth to wipe down the controller, paying special attention to the areas around the buttons and thumbsticks. For stubborn grime, you can use a cotton swab dipped in rubbing alcohol to carefully clean the nooks and crannies of the controller. Once you’re done cleaning, make sure the controller is completely dry before reassembling it and replacing the batteries.
It’s also important to regularly clean the external surfaces of your Xbox One controller to prevent dirt and grime from getting inside the device. To do this, use a can of compressed air to blow away any debris from the crevices around the buttons and triggers. Additionally, consider using a small brush to gently dislodge any accumulated dust. By keeping your Xbox One controller clean, you can ensure that it continues to function properly and provide a comfortable gaming experience for years to come.