Learn the art of blending car paint spot repairs with ease using our kit and pen for flawless results. Expert tips included.Are you tired of looking at that unsightly paint spot on your car? Whether it’s a small chip or a scratch, spot repair can be a relatively easy fix, but the key is to blend the new paint seamlessly with the existing paint. In this blog post, we’ll be discussing the art of blending car paint spot repair. We’ll cover everything from the tools and materials you’ll need to achieve a professional finish, to step-by-step instructions on how to blend the new paint with the old. Whether you’re using a repair kit, a touch-up pen, or just a can of matching paint, we’ve got you covered. With our tips and techniques, you’ll be able to tackle those pesky paint spots with confidence, leaving your car looking as good as new. Let’s dive in and learn how to blend car paint spot repair perfectly.
How To Blend Car Paint Spot Repair Perfectly
When it comes to car paint spot repair, achieving a seamless blend is essential for a professional finish. Whether you’re fixing small chips or scratches, the key to a perfect blend is in the preparation and application process.
Start by thoroughly cleaning the area to be repaired, using a mild detergent and water. Once dry, sand the damaged area with a fine-grit sandpaper to remove any loose paint or rust. Next, apply a coat of primer and allow it to dry completely before lightly sanding the area once more. When it comes to applying the color-matched paint, make sure to feather the edges to blend it seamlessly with the surrounding paint. With a steady hand and the right technique, you can achieve a flawless blend that will make the repair virtually invisible.
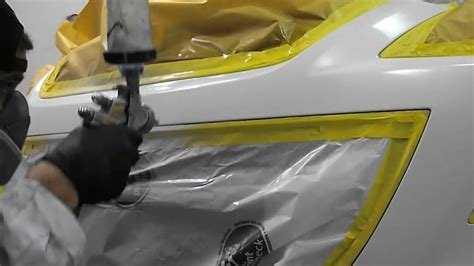
How To Blend Car Paint Spot Repair Kit
When it comes to fixing a small paint spot on your car, using a spot repair kit can be a great solution. With the right tools and techniques, you can seamlessly blend the new paint with the existing paint, making the repair nearly invisible. The key to achieving a flawless blend is to choose a high-quality spot repair kit and to follow a series of steps carefully.
First, start by cleaning the area around the spot thoroughly to remove any dirt, grease, or other contaminants. Then, lightly sand the area with fine-grit sandpaper to create a smooth surface for the new paint to adhere to. Next, apply the primer from the spot repair kit to the sanded area, following the manufacturer’s instructions. Once the primer is dry, use the touch-up paint from the kit to carefully cover the spot, layering the paint until it matches the surrounding area. Finally, apply the clear coat included in the kit to seal and protect the new paint, blending it seamlessly with the original paint.
How To Blend Car Paint Spot Repair Pen
When it comes to fixing small paint chips or scratches on your car, a touch-up pen can be a convenient and effective solution. However, blending the paint spot repair with the rest of the car’s paint can be a challenging task. Here are some tips to help you achieve a seamless and professional-looking finish.
First, start by thoroughly cleaning the area around the paint chip or scratch. Use a mild car detergent and water to remove any dirt, grime, or wax from the surface. Once the area is clean and dry, carefully assess the size and depth of the damage. Shake the touch-up pen well to ensure that the paint is properly mixed, and then apply a small amount of paint to the damaged area. Use a steady hand and apply the paint in thin layers, allowing each layer to dry before adding the next. This will help you build up the paint without creating a noticeable bump or ridge.