Learn the step-by-step process of forking a repository on Git and Github. Expert tips and troubleshooting included.Are you new to using Git and Github for version control and collaborating on projects with others? Forking a repository on Github is a fundamental skill to learn in order to contribute to open-source projects or collaborate with teammates. In this blog post, we will guide you through the process of forking a repo on Git and Github, step by step. Whether you are a developer looking to make changes to an existing project or a beginner hoping to understand the basics of version control and collaboration, this post will provide you with the knowledge and confidence to fork a repository and start working on your own copy. By the end of this guide, you will be ready to contribute to projects on Github and utilize the power of forking to enhance your development skills. So, let’s dive into the world of forking repositories in Git!
How to Fork a Repository on Git
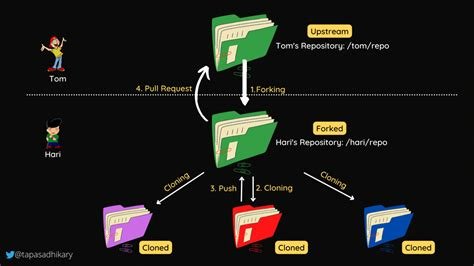
Forking a repository on Git is a simple and useful process for collaborating with others on a project. When you fork a repository, you create a copy of the original repository in your own account. This allows you to make changes to the code without affecting the original project. In this blog post, we will walk through the steps of forking a repository on Git and how to effectively collaborate with others using this feature.
First, navigate to the repository you want to fork on Git. Once you are on the repository’s page, click the Fork button in the top right corner of the screen. This will create a copy of the repository in your own account. You can then clone this forked repository to your local machine and make any necessary changes. After making your changes, you can push the changes to your forked repository and create a pull request to merge your changes back into the original repository. This process allows for seamless collaboration with other developers and ensures that the original project remains unaffected by your contributions.
How to Fork a Git Repository
Do you want to contribute to an open-source project on Git, but don’t know how to start? forking a Git repository is the first step to getting involved in a project. Forking a repository allows you to create a copy of the original project that you can freely experiment with without affecting the original codebase. In this blog post, we will walk through the steps to fork a Git repository and start making your own contributions.
First, log in to your Github account and navigate to the repository you want to fork. Once you are on the repository’s page, you will see a Fork button on the top right corner of the page. Click on this button, and Github will create a copy of the repository under your account. Now you have your own version of the project that you can freely modify and experiment with. This is a powerful feature of Git that allows for collaboration and experimentation in a controlled environment. Now that you have forked the repository, you can start making changes to the code, fixing bugs, adding new features, or making any other contributions you see fit.
How to Fork a Repo on Github
When you *fork* a repository on Github, you are creating a copy of the original repository that allows you to make changes without affecting the original project. This is a useful feature for collaborating on open source projects, experimenting with someone else’s project, or proposing changes to someone else’s project.
To fork a repository on Github, navigate to the repository’s page and click the *Fork* button in the upper right corner of the page. This will create a copy of the repository in your own Github account, allowing you to make changes as you see fit. You can then clone the forked repository to your local machine and make changes using Git. Once you are satisfied with your changes, you can submit a *Pull Request* to the original repository to propose your changes for inclusion. This is the basic process for forking and contributing to a repository on Github.