Learn how to easily repair cracks, holes, and chips in your fiberglass bathtub with our step-by-step guide. Save money and time with these DIY solutions!Are you tired of looking at that unsightly crack, hole, or chip in your fiberglass bathtub? Don’t worry, you don’t have to replace the entire bathtub to fix these common issues. In this blog post, we will walk you through step-by-step instructions on how to repair a fiberglass bathtub, no matter the problem. Whether it’s a small chip or a large crack, we’ve got you covered. Say goodbye to expensive repair bills and hello to a beautiful, fully restored bathtub. With just a few simple tools and materials, you can have your bathtub looking as good as new in no time. So, put on your DIY hat and get ready to learn how to tackle those pesky fiberglass bathtub repairs. Let’s get started!
How To Repair A Fiberglass Bathtub Crack
Repairing a fiberglass bathtub crack can be a simple process if you have the right tools and materials. The first step is to clean the area around the crack using a mild detergent and water. Once the area is clean and dry, use a fine-grit sandpaper to gently sand the edges of the crack to create a smooth surface for the repair.
Next, apply a fiberglass patch kit to the crack, following the manufacturer’s instructions. Use a putty knife to smooth the patch into place and remove any excess material. Allow the patch to dry completely before sanding it down to match the surrounding surface. Finally, apply a coat of gelcoat to the patched area to seal and protect the repair.
How To Repair A Fiberglass Bathtub Hole
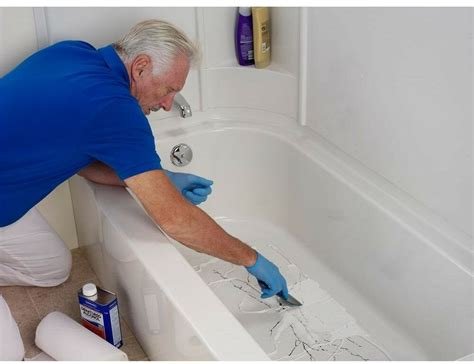
Repairing a fiberglass bathtub hole can be a simple and cost-effective solution to restoring the functionality of your bathtub. Whether the hole is the result of accidental damage or wear and tear over time, it’s important to address the issue before it leads to further damage. With the right materials and techniques, you can effectively repair a fiberglass bathtub hole and prevent the need for a costly replacement.
First, you’ll need to gather the necessary materials for the repair, including a fiberglass repair kit, sandpaper, and a putty knife. Begin by cleaning the area around the hole to ensure the surface is free of any debris or soap scum. Use the sandpaper to roughen the edges of the hole, which will help the repair material adhere to the surface. Next, carefully follow the instructions provided with the fiberglass repair kit to mix the resin and hardener, and apply it to the hole using the putty knife. Allow the repair material to dry and cure according to the manufacturer’s recommendations, and then sand the area smooth to blend it with the rest of the bathtub surface.
How To Repair A Fiberglass Bathtub Chip
Are you tired of looking at that unsightly chip in your fiberglass bathtub? There’s no need to replace the entire tub, as you can easily repair the chip yourself. The first step in repairing a fiberglass bathtub chip is to clean the area thoroughly. Use a mild detergent and water to remove any dirt and grime from the chipped area. Once the area is clean, dry it completely before moving on to the next step.
Next, you’ll need to fill the chip with a fiberglass repair kit. These kits can be found at most hardware stores and are easy to use. Follow the instructions on the kit to mix the resin and hardener, and then apply the mixture to the chipped area using a putty knife. Smooth out the mixture and allow it to dry completely. Once the repair is dry, you can sand it down to make it smooth and even with the rest of the tub. Finally, apply a gel coat to the repaired area to match the rest of the tub’s finish, and your fiberglass bathtub chip will be as good as new!