Learn how to replace, fix, and remove a toilet flange with expert tips and step-by-step instructions. Solve your toilet flange problems today!Is your toilet flange causing you trouble? A damaged or loose toilet flange can lead to leaks and instability in your bathroom. But before you call a plumber and spend a hefty sum, consider doing the repair yourself. In this blog post, we will walk you through the step-by-step process of repairing a toilet flange. From removing the old flange to installing a new one, we will cover everything you need to know to get your toilet back in working order. Whether you’re a DIY enthusiast or just looking to save some money on home repairs, learning how to repair a toilet flange can be a valuable skill. So, roll up your sleeves and get ready to tackle this common household issue.
How To Replace A Toilet Flange
Replacing a toilet flange may seem like a daunting task, but with the right tools and know-how, it can be done without calling a professional plumber. The first step in this process is to turn off the water supply to the toilet and drain the tank and bowl. Once the water is turned off and the toilet is empty, you can begin the process of removing the old flange.
Next, you will need to remove the nuts and bolts that secure the toilet to the flange. Once the toilet is removed, you can then unscrew the old flange from the floor. It’s important to clean the area around the flange thoroughly before installing the new one. Once the area is clean, you can then install the new flange and reattach the toilet, making sure it is securely in place. Finally, turn the water supply back on and test the toilet to ensure there are no leaks. With these steps, you can successfully replace a toilet flange and have your toilet working properly in no time.
How To Fix A Loose Toilet Flange
Have you noticed that your toilet is wobbling or leaking around the base? This could be a sign that your toilet flange is loose. A loose toilet flange can lead to more serious issues if not addressed promptly. Fortunately, fixing a loose toilet flange is a manageable DIY task that can save you from potential water damage and costly repairs down the line.
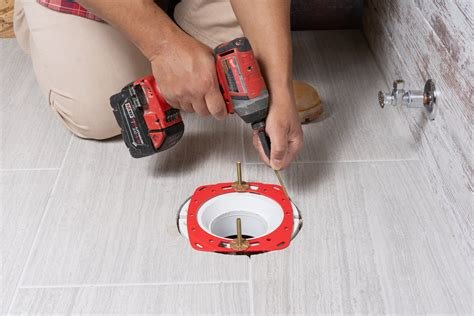
Firstly, gather the necessary tools and materials, which may include a wrench, screwdriver, new wax ring, and toilet flange repair kit. Next, turn off the water supply to the toilet and remove the toilet by carefully lifting it off the flange and setting it aside. Use a wrench to remove the bolts securing the toilet flange to the floor. Inspect the flange and surrounding area for any damage or corrosion. If the flange is damaged, it may need to be replaced. Otherwise, use the repair kit to reinforce the flange and ensure it is securely anchored to the floor. Finally, install a new wax ring and reattach the toilet, making sure it is level and secure.
How To Remove A Toilet Flange
Removing a toilet flange can be a difficult task, but with the right tools and a little know-how, it can be done. The first step is to turn off the water supply to the toilet and then remove the toilet from the flange. Next, use a wrench to remove the bolts that are holding the flange in place. Once the bolts are removed, you can then use a putty knife to carefully pry the flange up from the floor. Be sure to wear gloves and be careful not to damage the surrounding flooring.
After the flange is removed, you may need to clean the area to prepare it for a new flange installation. It’s important to inspect the area for any damage or leaks before installing the new flange. If there are any issues, they should be addressed before proceeding. Once the area is clean and ready, you can then install the new toilet flange according to the manufacturer’s instructions. With the proper tools and a little patience, removing a toilet flange can be a manageable task.