Learn how to fix, repair, or replace a broken iPhone charger cable with our easy step-by-step guide. Say goodbye to charging issues!Are you tired of constantly having to replace your iPhone charger because it keeps getting damaged? You’re not alone. It can be frustrating and expensive to constantly buy new chargers. But what if you could learn how to repair or replace your iPhone charger on your own? In this blog post, we will discuss some simple and cost-effective ways to fix a broken or damaged iPhone charger. From identifying the issue to finding the right tools and techniques, we will walk you through the process step by step. Say goodbye to the hassle of constantly buying new chargers, and say hello to a more sustainable and budget-friendly solution. Let’s dive into the world of DIY iPhone charger repair and replacement!
How to Fix a Broken Phone Charger
Have you ever experienced the frustration of a broken phone charger? It seems to happen at the most inconvenient times, leaving you without the ability to charge your phone. But fear not, there are ways to fix a broken phone charger without having to buy a new one.
First, check for any obvious signs of damage such as frayed wires or a bent connector. If you spot any of these, take caution to not use the charger as it may cause further damage to your phone. Next, you can attempt to carefully straighten out any bent parts or use electrical tape to secure any frayed wires. If these methods don’t work, it may be time to consider purchasing a new charger. However, if you’re feeling handy, you could also try soldering the broken parts back together if you have the necessary tools and expertise. Whatever method you choose, make sure to prioritize safety and consult a professional if needed.
How to Repair a Damaged iPhone Charger
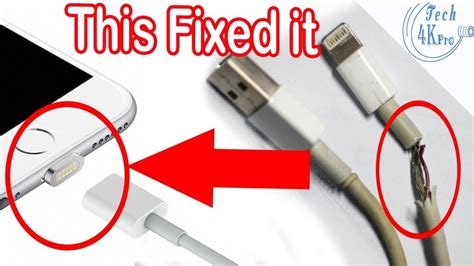
If you find yourself in a situation where your iPhone charger cable is damaged, don’t panic. There are a few simple steps you can take to repair it and get it working again. The first thing you should do is identify the damaged areas of the cable. Look for any frayed or exposed wires, as these are the most likely culprits of the issue. Once you’ve located the damaged areas, you can begin the repair process.
One method for repairing a damaged iPhone charger cable is to use electrical tape to cover the exposed wires. Start by wrapping the tape tightly around the damaged area, making sure to completely cover the exposed wires. This will prevent any further damage and protect the wires from coming into contact with each other. Another option is to use heat-shrink tubing, which can be slid over the damaged area and then heated to provide a secure, protective covering. By taking these simple repair steps, you can extend the life of your iPhone charger cable and avoid the need for a costly replacement.
How to Replace an iPhone Charger Cable
Are you constantly dealing with a frayed or damaged iPhone charger cable? It can be frustrating to have a charger that doesn’t work properly, especially when you rely on your phone for so many daily tasks. Fortunately, there are steps you can take to replace your iPhone charger cable and get your device back up and running in no time.
The first thing you’ll need to do is find a suitable replacement cable. Make sure to look for a cable that is compatible with your specific iPhone model. Once you have the replacement cable, you can simply disconnect the old cable from your phone and power adapter, and then connect the new cable in its place. Be sure to purchase a high-quality cable to avoid future damage and ensure that your phone continues to charge reliably.