Learn how to fix a ground fault, repair a ground wire, and test a ground fault with expert tips and step-by-step instructions.If you’re experiencing electrical issues in your home, such as tripped breakers or malfunctioning appliances, it could be due to an open ground in your electrical system. An open ground occurs when the connection between the electrical circuit and the earth is disrupted, which can lead to safety hazards and equipment damage. In this blog post, we will discuss the steps to repair an open ground in your electrical system. We will cover how to fix a ground fault, repair a ground wire, and test for a ground fault to ensure that your electrical system is safe and functioning properly. By addressing and resolving an open ground, you can improve the safety and reliability of your electrical system, as well as prevent potential damage to your appliances and electronics. Whether you’re a DIY enthusiast or looking to understand the basics of electrical maintenance, this guide will help you tackle and resolve an open ground in your home.
How To Fix A Ground Fault
– Blog Post
When dealing with an electrical system, a ground fault can be a common issue that needs to be addressed promptly. One way to fix a ground fault is to identify the source of the problem. This can be done by using a multimeter to test for continuity between the ground wire and the electrical panel. Once the source of the fault is identified, proper repairs can be made to ensure the safety and functionality of the electrical system.
Another effective way to fix a ground fault is to replace any damaged or deteriorated wiring. Over time, electrical wiring can become worn or damaged, leading to ground faults. By carefully inspecting the wiring and replacing any faulty sections, you can eliminate the ground fault and restore the proper function of the electrical system. It is important to follow all safety guidelines and regulations when working with electrical wiring to prevent accidents and ensure a successful repair.
How To Repair A Ground Wire
When it comes to repairing a ground wire, there are a few key steps that you need to follow in order to ensure that the repair is done correctly and safely. The first step is to identify the location of the damaged ground wire. This may require using a multimeter to test the circuit and determine where the break in the wire is located. Once the damaged area has been identified, it is important to cut out the damaged section of wire and strip back the insulation on either side to expose fresh, undamaged wire.
After the damaged section has been removed and the fresh wire exposed, the next step is to properly splice the new section of wire into place. This can be done using wire nuts or soldering, depending on the specific type of wire being used. It is important to ensure that the connection is secure and that the wire is properly insulated to prevent any risk of electrical shock or fire hazard. Once the repair has been completed, it is crucial to test the circuit to ensure that the ground wire is functioning properly and that there are no further issues with the electrical system.
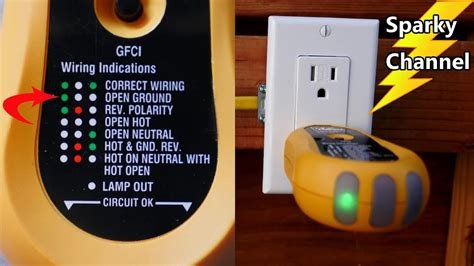
How To Test A Ground Fault
Testing a ground fault is an important part of electrical maintenance and safety. Ground faults can occur when a live wire comes into contact with a metal housing or another grounded metal object. To test for a ground fault, you will need a multimeter and a ground fault circuit interrupter (GFCI) tester. Begin by turning off the power to the circuit you will be testing and then using the multimeter to check for any continuity between the live wire and the metal housing. If there is continuity, there is a ground fault. Next, use the GFCI tester to check for proper grounding and to ensure that the GFCI will trip when a fault is detected. By regularly testing for ground faults, you can ensure the safety of your electrical system and prevent potential hazards.