Learn how to fix, replace, and test for a blown subwoofer with expert tips and techniques. Get your sound system back on track.If you’re a music lover or an avid audio enthusiast, you probably know the frustration of dealing with a blown subwoofer. Whether it’s the result of pushing your sound system to its limits or simply wear and tear over time, a blown subwoofer can put a damper on your listening experience. But before you start shopping for a brand-new replacement, there are a few steps you can take to potentially repair the damage and get your subwoofer back in action. In this blog post, we’ll cover everything you need to know about fixing, replacing, and testing a blown subwoofer. From identifying the problem to troubleshooting potential solutions, we’ll guide you through the process of reviving your subwoofer and getting your audio system back to its full potential. Whether you’re a DIY enthusiast or simply looking to save some money on a costly replacement, we’ve got you covered with expert tips and advice.
How To Fix A Blown Subwoofer
Are you experiencing a less than optimal sound quality from your subwoofer? It’s possible that your subwoofer may be blown. Luckily, there are ways to fix a blown subwoofer without having to replace it entirely. By following some simple steps, you can restore your subwoofer to its former glory and enjoy high-quality sound once again.
First, start by testing the subwoofer to confirm that it is indeed blown. This can be done by playing a known audio source and listening for any distortions or rattling sounds. If you notice any unusual noises, it’s likely that your subwoofer is blown. Once the issue has been identified, you can move on to the repair process.
How To Replace A Blown Subwoofer
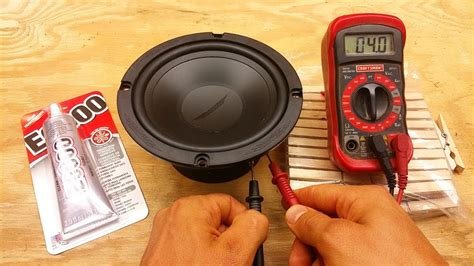
When it comes to enjoying your favorite music or movies, a blown subwoofer can really put a damper on things. But fear not, replacing a blown subwoofer is actually a fairly simple task that you can do on your own. The first step is identifying the issue and confirming that the subwoofer is indeed blown. This can be done by testing the subwoofer using a multimeter to check for continuity. Once you’ve confirmed that the subwoofer is blown, it’s time to start the replacement process.
Before you begin, it’s important to make sure that you have the correct replacement subwoofer that is compatible with your existing setup. You’ll also need to gather the necessary tools such as a screwdriver, wire cutters, and wire strippers. Once you have everything you need, start by disconnecting the blown subwoofer from the amplifier or receiver. Next, carefully remove the subwoofer from its enclosure, taking note of how it was mounted and the wiring connections. After removing the old subwoofer, simply reverse the process by mounting the new subwoofer, making the proper wiring connections, and securing it in place. Finally, reconnect the new subwoofer to the amplifier or receiver and test it out to ensure everything is working properly. With these replacement steps, you’ll be back to enjoying deep and powerful bass in no time.
How To Test A Blown Subwoofer
Subwoofers are an essential component of any audio system, but they can be susceptible to damage over time. If you suspect that your subwoofer is blown, it’s important to test it to confirm the issue before attempting to repair or replace it.
One way to test a blown subwoofer is to disconnect it from the amplifier and use a multimeter to check the resistance of the subwoofer’s voice coil. By measuring the resistance, you can determine if there is a break in the voice coil, which is a common cause of subwoofer failure. Additionally, you can also listen closely to the subwoofer while playing audio at a moderate volume. If the subwoofer produces distorted or muffled sound, it is likely blown and will need to be repaired or replaced.