Learn how to repair, replace, and fix a cigarette lighter in your car with our step-by-step guide. Keep your vehicle powered up.If you’re a frequent traveler or just someone who relies on their car for day-to-day activities, having a functioning cigarette lighter can be crucial. Whether it’s for charging your phone, using a portable air compressor, or simply lighting a cigarette, a broken or malfunctioning cigarette lighter can be a major inconvenience. Fortunately, repairing or replacing a cigarette lighter in your car is a relatively simple task that you can do on your own with just a few basic tools and a little know-how. In this blog post, we will walk you through the step-by-step process of repairing, replacing, and fixing a cigarette lighter in your car. By the time you’re finished reading, you’ll have the knowledge and confidence to tackle this common car issue on your own, saving yourself time and money in the process.
How To Repair Cigarette Lighter In Car
One common problem that many car owners face is a malfunctioning cigarette lighter. It can be frustrating when you need to use it to power your phone or other electronic devices, only to find that it doesn’t work. However, repairing the cigarette lighter in your car is often a simple fix that can be done at home without the need for professional help. Here are some steps you can take to repair the cigarette lighter in your car.
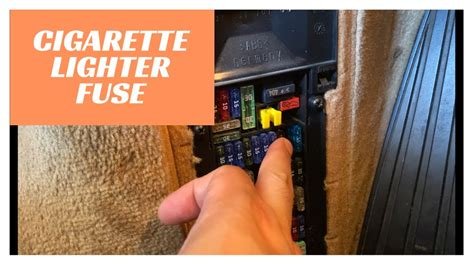
First, you’ll need to locate the fuse box in your car. This is usually located under the dashboard or in the engine compartment. Once you’ve found the fuse box, you can use the diagram on the fuse box cover to locate the fuse for the cigarette lighter. If the fuse is blown, you can simply replace it with a new one of the same amperage. If the fuse keeps blowing, it may indicate a larger electrical problem that will need to be addressed by a professional. If the fuse is not the issue, you can also check the wiring connected to the cigarette lighter to ensure that it is not loose or damaged. Sometimes, a loose or damaged wire can cause the cigarette lighter to stop working. By following these steps, you can often repair the cigarette lighter in your car and have it working again in no time.
How To Replace Cigarette Lighter In Car
Replacing a cigarette lighter in your car is a simple process that can be done with a few basic tools. First, you’ll need to remove the old cigarette lighter from the dashboard of your car. This can usually be done by gently prying it out with a small flathead screwdriver. Once the old lighter is removed, you can disconnect the wiring harness from the back of it. Be sure to take note of which wires are connected to which terminals, as you’ll need to re-connect the new lighter in the same way.
Next, you’ll need to connect the wiring harness to the new cigarette lighter and secure it in place in the dashboard. Once the new lighter is properly connected and secured, you can test it to make sure it is working properly. If everything is functioning as it should, you can then replace any trim pieces or panels that you had to remove to access the lighter. With these steps, you can easily replace the cigarette lighter in your car and have it working like new in no time.
How To Fix Cigarette Lighter In Car
One of the most common issues with a car’s cigarette lighter is that it stops working. This can be frustrating, especially if you rely on it to power your electronic devices while on the go. Fortunately, there are a few steps you can take to repair the cigarette lighter in your car.
First, check the fuse. The cigarette lighter in your car is powered by a fuse, so if it’s not working, the first thing to do is check the fuse box. Find the fuse that corresponds to the cigarette lighter and check to see if it’s blown. If it is, simply replace it with a new fuse of the same amperage. If the fuse isn’t the issue, the problem may be with the wiring or the actual lighter socket itself. In this case, it’s best to consult a professional mechanic to diagnose and repair the issue.