Learn the best tips for repairing laminate, vinyl, and engineered hardwood click-lock flooring. Easy DIY solutions for common flooring issues.Have you noticed some wear and tear on your click-lock flooring? Whether it’s laminate, vinyl, or engineered hardwood, there are certain steps you can take to repair it and give it a fresh new look. In this blog post, we will explore the best methods for repairing each type of click-lock flooring to help you keep your floors looking beautiful for years to come. From replacing damaged planks to fixing scratches and dents, we’ll cover everything you need to know to tackle any repair job. So, if you’re ready to learn how to restore the beauty of your click-lock flooring, keep reading for our expert tips and tricks. Whether you’re a seasoned DIYer or a beginner, you’ll find valuable information to help you get the job done right and enjoy your beautiful floors once again.
How To Repair Laminate Click-Lock Flooring
Repairing laminate click-lock flooring can be a simple and straightforward process if you have the right tools and materials. When it comes to repairing laminate flooring, the most common issues are dents, scratches, and water damage. To repair a dent or scratch in the laminate flooring, you can use a laminate floor repair kit, which typically includes wax pencils, putty, and a scraper. Simply fill in the damaged area with the putty, smooth it out with the scraper, and then use the wax pencil to blend in the color. For water damage, it’s important to first identify and repair the source of the water before addressing the flooring. Once the source of the water damage is fixed, you can use a hairdryer or fan to dry out the affected area of the laminate flooring.
Another common issue with laminate click-lock flooring is separating or buckling of the planks. This can occur due to fluctuations in humidity or improper installation. To repair separated or buckled planks, you may need to remove the damaged planks and replace them with new ones. It’s important to carefully follow the manufacturer’s guidelines for removing and replacing click-lock laminate flooring in order to ensure a proper fit and prevent further issues. In some cases, it may be necessary to consult a professional for repairs, especially if the damage is extensive or if the flooring is still under warranty. By properly maintaining and addressing any issues with your laminate click-lock flooring, you can keep it looking great for years to come.
How To Repair Vinyl Click-Lock Flooring
When it comes to repairing vinyl click-lock flooring, it’s important to first assess the damage and determine the best course of action. Whether you’re dealing with a small scratch or a larger area of damage, there are a few key steps to take in order to restore your flooring to its former glory.
First, you’ll want to thoroughly clean the damaged area, removing any dirt or debris that may be present. Once the area is clean, you can assess the specific type of damage you’re dealing with. For minor scratches, a simple vinyl repair kit may be all you need to fill in the gouges and make the flooring look like new. For larger areas of damage, you may need to consider replacing the affected planks entirely.
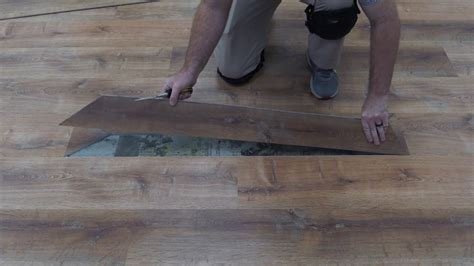
How To Repair Engineered Hardwood Click-Lock Flooring
Engineered hardwood click-lock flooring can be a beautiful and durable addition to any home, but like any flooring, it can be subject to damage over time. Whether it’s a scratch, a dent, or a loose plank, knowing how to properly repair your engineered hardwood click-lock flooring can help extend its lifespan and keep it looking its best.
One common issue with engineered hardwood click-lock flooring is the occurrence of loose or damaged planks. If you notice a plank that is no longer firmly locked in place, you can often repair it without having to replace the entire floor. Begin by carefully removing the baseboards surrounding the damaged area, then gently lift and remove the damaged plank. Once the plank is removed, clean the subfloor and remove any debris that may be interfering with the locking mechanism. Inspect the locking system on the surrounding planks to ensure they are in good condition, and if necessary, replace any damaged components. Finally, carefully install the new plank, making sure it is securely locked in place, and reattach the baseboards.