Learn how to effectively fix and repair a cracked plastic radiator with our step-by-step guide. Easy DIY solutions for your car radiator.Are you dealing with a cracked plastic radiator in your car? It can be a frustrating and potentially costly issue, but the good news is that you may be able to repair it yourself with a few simple steps. In this blog post, we will cover everything you need to know about repairing a cracked plastic radiator. From understanding the common causes of radiator cracks to learning how to effectively patch and fix them, we’ve got you covered. We’ll walk you through the step-by-step process of repairing a cracked plastic radiator, saving you time, money, and the headache of dealing with a professional mechanic. By the end of this post, you’ll feel confident in your ability to tackle this repair job on your own. Keep reading to learn how to fix your cracked plastic radiator and get back on the road with peace of mind.
How To Fix Cracked Plastic Radiator
Repairing a cracked plastic radiator can seem like a daunting task, but with the right tools and know-how, it can be a straightforward process. The key to fixing a cracked plastic radiator is to identify the location and size of the crack.
Once you’ve located the crack, you’ll need to clean the area thoroughly and apply a strong adhesive, such as epoxy, to seal the crack. It’s essential to ensure that the adhesive has fully cured before refilling the radiator with coolant. By following these steps, you can save time and money by repairing your cracked plastic radiator instead of replacing it.
How To Patch Cracked Plastic Radiator
Repairing a cracked plastic radiator can be a simple and cost-effective solution to a potentially serious problem. A cracked radiator can lead to overheating and engine damage if left untreated. Luckily, with a few simple tools and materials, you can patch a cracked plastic radiator yourself. Follow these steps to get your radiator back in working order.
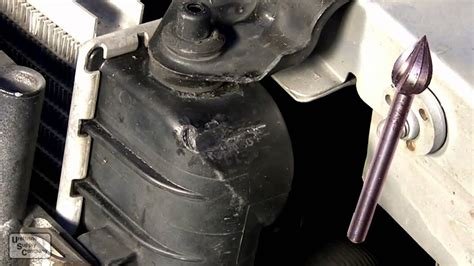
First, make sure the radiator is cool before attempting any repairs. Once the radiator is cool, locate the crack and clean the area around it with a mild detergent and water. Use a wire brush to remove any loose plastic or debris from the surface of the crack. Once the area is clean, use a plastic epoxy to patch the crack. Apply the epoxy to the crack, making sure to cover the entire damaged area. Allow the epoxy to dry completely before refilling the radiator with coolant. Once the radiator is refilled, check for any leaks and monitor the temperature gauge to ensure the repair was successful.
Repair Cracked Plastic Radiator
If you’re experiencing issues with a cracked plastic radiator in your vehicle, don’t fret – you can take care of this problem on your own without needing to take it to a professional mechanic. The first step to repairing a cracked plastic radiator is to locate the crack. Once you have located the crack, use a clean cloth to wipe the area around it to remove any dirt or debris that could interfere with the repair process.
After cleaning the area, use a plastic repair epoxy to fill the crack. This epoxy is specifically designed for repairing plastic radiators and can withstand the high temperatures and pressures present in a vehicle’s cooling system. Apply the epoxy according to the instructions on the packaging, making sure to cover the entire crack and create a strong bond. Once the epoxy has been applied, allow it to cure for the recommended amount of time before refilling the radiator with coolant and testing for leaks. With these simple steps, you can easily repair a cracked plastic radiator and get back on the road without any issues.