Learn how to fix cracked plaster ceiling, repair holes, and patch plaster ceiling cracks with our step-by-step guide. Expert tips and techniques included!Do you have cracks or holes in your plaster ceiling that need fixing? Don’t worry, you’re not alone! Many homeowners encounter this common issue, but the good news is that repairing plaster cracks in the ceiling is a manageable DIY project. In this blog post, we will guide you through the step-by-step process of fixing cracked plaster ceilings and repairing holes in plaster ceilings. From identifying the root cause of the problem to applying the right materials and techniques, we’ve got you covered. By the end of this post, you’ll have the knowledge and confidence to tackle your plaster ceiling repairs like a pro. So, let’s roll up our sleeves and get ready to transform those unsightly cracks and holes into a smooth, seamless ceiling once and for all.
How To Fix Cracked Plaster Ceiling
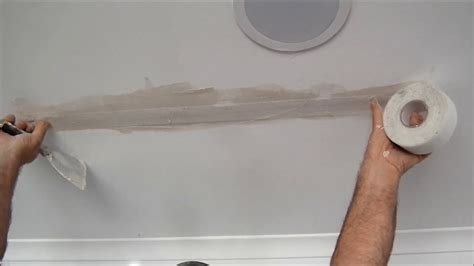
Are you dealing with a cracked plaster ceiling in your home? Don’t worry, it’s a common issue in older homes, but it’s fairly easy to fix with the right tools and techniques. The first step is to assess the severity of the crack. If it’s a hairline crack, you can probably fix it with some joint compound and a putty knife. If the crack is larger, you may need to use a plaster patching compound.
Once you’ve assessed the crack, you can begin the repair process. Start by cleaning the area around the crack to remove any loose plaster or debris. Next, apply a layer of joint compound to the crack, using a putty knife to smooth it out. Allow the compound to dry completely, then sand it down until it’s smooth and level with the rest of the ceiling. Finally, you can paint over the repaired area to blend it in with the rest of the ceiling.
How To Repair Holes In Plaster Ceiling
Repairing holes in a plaster ceiling can seem like a daunting task, but with the right tools and techniques, it can be done efficiently and effectively. The first step is to gather all the necessary materials, including a putty knife, sandpaper, joint compound, and a drywall patch. Once you have everything you need, you can begin the repair process.
Start by clearing away any loose debris or pieces of plaster from the hole. Use the putty knife to gently scrape away any loose material, being careful not to create any further damage. Once the hole is clean and free from any loose debris, you can apply the joint compound to the edges of the hole. Smooth it out with the putty knife, making sure to create a level surface. Once the compound is dry, sand it down gently to create a smooth finish. Finally, apply the drywall patch over the repaired area and cover it with a layer of joint compound. Once dry, sand it down again and your plaster ceiling will look as good as new.
How To Patch Plaster Ceiling Crack
Are you dealing with a pesky crack in your plaster ceiling? You’re not alone. Many homeowners struggle with this issue, but the good news is that it’s completely fixable. Repairing cracks in plaster ceiling is a relatively simple process that can be done by DIY enthusiasts or professionals. With the right tools and materials, you can have your ceiling looking as good as new in no time.
First, you’ll need to gather the necessary supplies. This includes plaster patching compound, a putty knife, sandpaper, and primer. Once you have everything you need, you can begin the repair process. Start by carefully removing any loose plaster from the cracked area. Next, apply the patching compound using your putty knife, making sure to smooth it out evenly. Allow the compound to dry completely, then sand it down until it’s smooth. Finally, apply a coat of primer to seal the repair and ensure a seamless finish.