Learn how to fix, replace, and patch your RV roof with expert tips and methods. Keep your RV safe and secure.Are you a proud owner of an RV, but have noticed some wear and tear on the roof? Don’t worry, you’re not alone. Many RV owners face the challenge of keeping their vehicle’s roof in top condition. Whether it’s a small leak or visible damage, knowing how to repair and maintain your RV roof is essential for protecting your investment and ensuring a comfortable living space on the road.
In this blog post, we will cover three key methods for repairing your RV roof: fixing, replacing, and patching. Each method has its own set of requirements and procedures, and we’ll walk you through the steps for each one. By the end of this post, you’ll have the knowledge and confidence to tackle any roof repair task that comes your way. So, grab your tools and let’s get started on keeping your RV roof in top shape!
How To Fix RV Roof
Are you a proud owner of an RV? Then you know how important it is to keep your RV roof in top condition. Over time, the roof of your RV can develop cracks, leaks, and other issues that need to be addressed.
One of the best ways to fix RV roof issues is to use a sealant specifically designed for RV roofs. Begin by thoroughly cleaning the roof to remove any dirt, debris, or old sealant. Once the roof is clean, apply the sealant following the manufacturer’s instructions. Be sure to apply the sealant evenly and cover any problem areas, such as cracks and seams, completely. Allow the sealant to dry thoroughly before exposing the roof to any moisture.
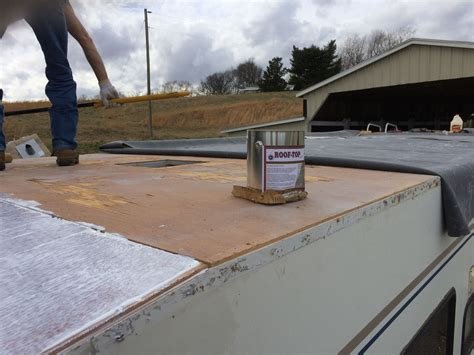
How To Replace RV Roof
If you are in need of replacing your RV roof, it is important to consider the type of material you want to use. RV roof replacement is a significant investment, so you want to make sure you choose a durable and reliable material such as EPDM rubber roofing or TPO roofing. These materials are known for their longevity and resistance to harsh weather conditions, making them ideal for RV use.
Once you have selected the appropriate roofing material, it is important to properly prepare the roof surface before installation. This involves removing the old roofing material, cleaning the surface, and making any necessary repairs to the underlying structure. It is crucial to ensure that the roof surface is smooth and free of any debris before proceeding with the installation of the new roof.
How To Patch RV Roof
Repairing the roof of your RV is an essential maintenance task to ensure your vehicle stays in top condition. A common issue that many RV owners face is roof leaks, which can cause damage to the interior of the vehicle. Knowing how to patch the roof of your RV can save you time and money in the long run.
One of the first steps in patching the roof of your RV is to identify the source of the leak. Inspect the roof for any cracks, holes, or damage to the sealant. Once the source of the leak has been identified, you can begin the patching process. Apply a strong adhesive sealant to the damaged area, making sure to cover the entire affected area. After applying the sealant, allow it to dry completely before testing for leaks.