Learn expert tips for fixing and repairing wallpaper seams and splits. Say goodbye to unsightly walls with these DIY techniques.Are you tired of staring at the unsightly seams in your wallpaper? Don’t worry, you’re not alone. Many homeowners struggle with the issue of wallpaper seams splitting and peeling over time. But the good news is that repairing these seams doesn’t have to be a daunting task. In fact, with the right tools and techniques, you can have your wallpaper looking as good as new in no time.
In this blog post, we will walk you through the step-by-step process of how to fix wallpaper seams and repair any splitting or peeling that may have occurred. From gathering the necessary supplies to properly prepping the wallpaper and finally, making the necessary repairs, we’ve got you covered. Say goodbye to those frustrating wallpaper issues and hello to a beautifully refreshed space. Let’s dive in and learn how to repair wallpaper seams together.
How to Fix Wallpaper Seams
Wallpaper seams can be a real eyesore in an otherwise perfectly decorated room. But fear not, with the right tools and techniques, you can easily repair those pesky seams and have your walls looking as good as new. The first step in fixing wallpaper seams is to gather your materials. You will need a utility knife, wallpaper adhesive, a seam roller, and a damp sponge.
Next, carefully use the utility knife to gently lift the edges of the wallpaper along the seam. Be sure to only lift the edges enough to apply the adhesive underneath. Then, apply a thin layer of wallpaper adhesive to the underside of the lifted edges using a small paintbrush. Once the adhesive is applied, use the seam roller to firmly press the edges back down, working from the center of the seam outwards. Finally, use a damp sponge to wipe away any excess adhesive and smooth out the seam. With these steps, your wallpaper seams will be repaired and your walls will look flawless once again.
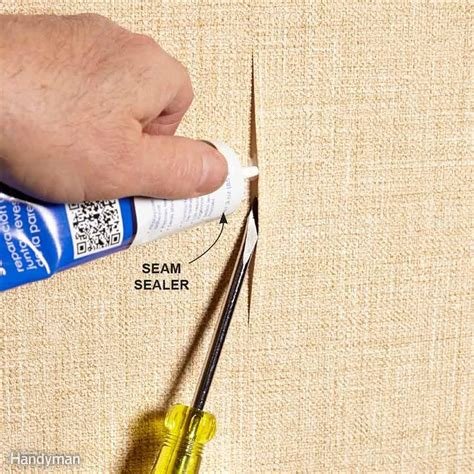
How to Repair Wall Paper Seams
Wallpaper can give a room a fresh new look, but over time, seams can start to come apart. The good news is that repairing wallpaper seams is a fairly simple process that you can do yourself. To get started, you’ll need a few basic supplies including wallpaper seam adhesive, a putty knife, a damp sponge, and a wallpaper roller. Once you have your supplies, you can begin repairing those unsightly wallpaper seams.
Start by using the putty knife to gently lift the edges of the wallpaper along the seam. Next, apply wallpaper seam adhesive to the back of the lifted edges, using the putty knife to spread it evenly. Smooth the wallpaper back down and use a damp sponge to wipe away any excess adhesive. Finally, use a wallpaper roller to press the seam firmly into place. With the right tools and a little bit of patience, you can have your wallpaper looking as good as new in no time.
How to Repair Wallpaper Seam Splitting
Wallpaper seam splitting can be a frustrating issue for many homeowners, but with the right tools and techniques, it can be easily repaired. The first step is to carefully examine the split seam and determine the cause of the splitting. This could be due to improper installation, humidity, or simply the age of the wallpaper. Once the cause is identified, you can proceed with the necessary repairs.
One of the most effective ways to repair wallpaper seam splitting is by using a strong adhesive. Apply the adhesive to the back of the wallpaper, ensuring that it covers the entire split seam. Press the wallpaper firmly against the wall, using a roller to smooth out any air bubbles or wrinkles. Allow the adhesive to dry thoroughly before examining the seam to ensure that it is fully repaired. If the seam splitting persists, it may be necessary to remove the section of wallpaper and reapply it with a fresh adhesive. By following these steps, you can effectively repair wallpaper seam splitting and restore the aesthetic appeal of your walls.